Monday, January 30, 2012

Sneaky Beef


Alley Cat by Chet Atkins
I know that Chet Atkins isn't the original artist on this song - it's Bent Fabric, who released it as a piano number in the early sixties.  I love that recording as well since I play the piano.  So why did I go with Chet?  Because it's guitar.  And it's Chet.  And that, people, is a formidable duo in my book!  Also, my father used to play this song on his guitar.  Case closed.  Why Alley Cat?  Because it's a sneaky sounding song.  I can just see that old cat slinking down an alley, seeing what mischief he can get into.  I can also see it as the perfect backdrop for a magician act - you know, lots of hand waving, "See?  Nothing up my sleeve!" paired with long pauses, and then the big flourish of pulling a rabbit, or in this case, a roast, out of your hat.  It's winter and it's the best time to pull an entire meal of sneaky comfort food out of your hat!  It's a very dramatic and satisfying end to, really, not much effort at all!

I always feel a little guilty when I serve this and get raves about how delicious it is and how I shouldn't have gone to so much trouble.  I didn't.  Hence, the sneaky label.  It's the easiest thing out there to eat - other than pouring yourself a glass of water!  If you don't already know about it, it's time you did.  Especially if you're as busy as I am - and chances are, you are!

I don't remember who shared this trick with me but I'm so glad they did!  It's been a "go-to" for ages now and, when my kids leave home and ask for something simple to make, I share it with them.  Two ingredients and a crock pot!  Oh dear, I'm almost embarrassed at how easy this is!  Here we go.

Crock Pot Roast
Printable Recipe Card
1 beef roast, I used a chuck roast
1 envelope dry onion soup mix

Yep, that's it!

Put the roast in the crock pot and sprinkle the soup mix over top.  Top with the lid.


There's no liquid, it makes its own!

Cook low and slow for 6 - 8 hours.  If you like to slice your roast, cook for less time.  At 8 hours, my preference, it just falls apart.  I had to really work to get a bit of the roast to stay together for that picture at the top!  From this point you can use it for so many things!  Add barbecue sauce to the shredded meat and you have a wonderful BBQ beef sandwich!  Add some cumin and chili powder and you have a great filling for tamales or quesadillas or tacos!  It would also be delicious with some teriyaki sauce or soy sauce  and asian spices and served with rice.  

To make the gravy, just pour the liquid from the pot into a sauce pan.  Pour 1/4 cup of cold water into a jar with a lid.  Then add 2 tablespoons of flour, put on the lid, and give it a shake!  When the liquid in the pan is at a slow boil, stir in the flour/water slurry and stir.  It will thicken right up.  Taste and add salt, if needed.  Super easy!

You might have noticed those glorious carrots on the plate.  


I was in Seattle over the weekend and stopped at Pike Place Market and found these gorgeous heirlooms and HAD to have them!  


Knowing they would be going with this roast I figured I'd have to give them a special treatment, something with bright accents to counter all the unctuous flavors of the roast and mashed potatoes.  

I gave them a strongly angled cut to create more surface area then steamed them for about 5 minutes, just until al dente.


While they were steaming I got a sauté pan ready with a tablespoon of butter, melting and swirling it around to coat the pan.  When the carrots were ready I just tipped them into the sauté pan, seasoned them with kosher salt and a bit of chopped fresh parsley and fresh dill.  I tossed them around a bit because that's what chefs do.  Perfect!


Thursday, January 26, 2012

Solid Beer


Meet Virginia by Train
Today's post is about seeing things in a new way - like Virginia.  I love this song for many reasons, not the least of which is the fact that this guy has really taken the time to get to know this girl.  He sees what some may perceive as her flaws and loves her the more for them.  It's exciting for me to discover the unexpected about people - and food - and get to see them in a different light.  The phrase in this song, "wears high heels when she exercise" always makes me think of my friend, Wendy.  Not that she literally does this - but she DID show up to go golfing in high heel wedges once when on a double date with our husbands.  Now, Wendy is one of those people that I had pegged very differently upon initial acquaintance.  Getting to know the "real" her was a big surprise and she has become one of my absolute dearest friends.  Underneath all that big blonde hair is one of the most loving and caring people I know.  Now, let's talk bread . . . .


"Bread is nothing more than solid beer, and beer is nothing more than liquid bread." My baking teacher made this statement in class one day.  Huh.  My mind really stopped and kind of hung up right there, like the whirling rainbow wheel on my Mac.  Processing, processing, . . . .  

I'd really never thought of it like that before.  Mostly because beer isn't a part of my life.  I cook with it now and then, like when I try, yet AGAIN, to recreate the amazing Flemish stew I had in Bruges, Belgium several years ago.  On a day to day basis, though, beer just isn't in my thoughts.  Apparently it's in many other people's thoughts though!  

After water and tea, beer is the most widely consumed beverage in the WORLD.  That makes it the number one alcoholic beverage consumed in the WORLD.  It's existence can be traced back to around 3000 BC and there are even laws regulating it in the Code of Hammurabi!  My father used to drink it when I was a very little girl and, sometimes, let me sip some of the foam off the top.  As a young mother I heard from other moms that beer was a great way to increase your milk supply if you were nursing - or you could just take yeast tablets.  Which leads us to the fact that makes what my teacher said very logical - beer is all about the yeast - and so is bread, right?

I searched out recipes that used beer for the yeast in bread and found the one I'm passing along to you today.  Beer bread is like no other.  If made right, the inside can be as springy as regular bread.  


And by "made right" I mean, you have to sift together the dry ingredients.  This keeps the ingredients light and airy and you need that air.  This bread belongs to the quick bread family.  There's no kneading involved and it is truly the quickest bread I've ever made - even when taking the time to properly sift the ingredients.  If you would prefer to use a non-alcoholic beer, you'll need to sprinkle in a bit of yeast, about 2 teaspoons or a packet.  Also, you can either stir the melted butter into the dough to keep the surface soft or pour it on the top to give it a bit of crust.  I opted for the latter and was not disappointed.  Oh, it's sooo good!  It goes perfectly with soups on a cold winter night, but, also makes a tasty breakfast - especially when topped off with a yummy jam - like this peachy habanero or berry rhubarb concoction. 


On second thought - why wait for breakfast?  Meet Virginia, er, I mean my bread - or should I say, meet my beer?

Beer Bread
Printable Recipe Card
makes 1 loaf
from Food.com 

3 cups flour
3 t. baking powder
1 t. kosher salt
1/4 c. sugar
1 (12 oz) can or bottle of beer
1/4 c. butter, melted

Preheat oven to 375 degrees.

SIFT TOGETHER THE DRY INGREDIENTS into a bowl.  I just use a fine mesh sieve like this -


and shake it side to side, giving it a tap with my other hand.  Pour in the beer and stir just until combined.


 Spread batter into a greased 9x5 loaf pan and pour melted butter over the top.


Bake for one hour.  Let cool for 15 minutes in pan before turning out to cool further on a rack.  Slice and enjoy!  I sure did!


Monday, January 23, 2012

Calling All Crockpots!


I've Got My Love To Keep Me Warm by Dean Martin
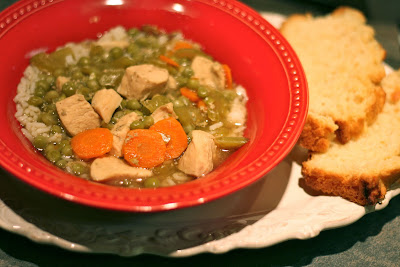
I know this song talks about it being December, and it's January, but, believe it or not, December really wasn't that long ago!  Besides, it's the perfect cozy song for this chicken soup.  Dean Martin is very cool in our house.  My husband and I grew up in very different home environments, but we do share much of the same music memories - Dean Martin being one of those.  Hearing his music while we are out and about always gets us excited - like a week ago when we went to see the new Mission Impossible movie, which started with Ain't That A Kick In the Head!  I've never enjoyed a fight scene as much as I apparently did this one, seeing as how I smiled through the whole thing!  Not for the love of violence, mind you, but for the love of Dean!  When we happen upon those "spontaneous Dean" moments it's as if we've found another soul who gets it!  Dean is comfort music.  Chicken soup is the absolute definition of comfort food - and I'd like to share this variation with you today!


Well, the snow has finally arrived.  About a month too late for my tastes, thank you very much!  I'm not as much of a fan of the white stuff as I used to be.  I grew up in the northwest corner of Pennsylvania within striking distance of Lake Erie's relentless lake-effect snow belt.  I have also lived in the outskirts of Syracuse, New York, where it also knows how to snow very, very well.  Then top that off with another huge chunk of my life spent in Utah where they actually boast of having the "best snow on earth!"  Believe me, I know snow!

But I'm tired of it.  I love it to show up for Christmas, for which I'm convinced it was intended in the first place.  But, if it doesn't come for Christmas, I think it just shouldn't come at all!  That's why I like it where I live now in the Pacific northwest.  We don't usually get much - and it knows to leave after a few days.  Alas, as I mentioned before, it is here right now  - and people are pulling out their crockpots in a feverish rush!

The crockpot is a marvelous invention!  It is the best friend of everyone - working moms and stay-at-home moms alike, bachelors living alone, students at college.  It's purpose is it's main allure - putting everything in one pot, going about your business, and returning to the pot hours later for a hearty, delicious meal when you're exhausted and can't bear the thought of having to do all the prep for an eat-in meal.  It's the perfect alternate choice to the drive-thru line for a burger and fries - again.  It just takes a few minutes of forethought - a very good habit to adopt!

Another good reason to use a crockpot, beside it's convenience, is that it's a great budget extender.  Slow cooking is usually intended for the more tougher cuts of meat - also usually the least expensive cuts of meat.  It takes time to break down the connective tissue and the lean muscle mass of these meats and the crockpot gives you plenty of time for this to occur while adding tons of flavor in the process.

A drawback of the slow cooker?  Sometimes things - veggies, starches - can become mushy.  Actually, this is a dilemma with any soup and why many people don't like leftovers.  Mush is not appealing!  I deal with this problem by not adding my rice or noodles to my soups during the cooking process.  As I did when I worked briefly in a commercial kitchen, I cook them separately and hold them on the side.  As I serve the soup, I place the rice or noodles in the bowl then ladle the soup over top.  Each bowl serves as if it's the very first bowl of soup served that day!  Be honest.  You know when you're being served the bottom of the soup pot!  The added perks to this procedure is that you can control your rice portions - rice lovers can have more, those not as fond can have little or none if they wish.  You also can use any leftover rice to make rice pudding!  For use with the crockpot, you can easily make it the rice the night before and refrigerate it.  It all works out beautifully!

Crockpot Chicken Soup with Rice
serves 6
Printable Recipe Card
2 chicken breasts, cut into chunks
1 stalk celery, sliced
1 large carrot, peeled and sliced
1/2 t. salt
1/2 t. thyme or 3 sprigs fresh
1/2 t. sage or a few leaves fresh
1/2 t. black pepper
1 qt. chicken stock
2 T. cornstarch
2 c. cooked rice
half bag of frozen peas and pearl onions

Place everything except the cornstarch, cooked rice, and the frozen veggies into a crockpot and cook on high for 4 hours or low for 6 hours.

About a half hour before serving, place cornstarch in a small bowl and ladle some of the soup liquid into the bowl and stir to make a "slurry."  A slurry is a thickener.  When made with cornstarch it thickens without adding the cloudiness that flour does.  Stir the slurry into the crockpot and stir well.

Add the frozen veggies and stir and cook until heated through - about 10 minutes.  Waiting to add the peas keeps their color bright and vibrant.  You can add them at the beginning but the peas get mushy and it's just not as pretty, see?


Fill bowl with desired amount of warm cooked rice and ladle soup over top - and warm up from the inside out!!

Thursday, January 19, 2012

Day, Me Say Day O!


Day-O (Banana Boat Song) by Harry Belafonte
Songs about bananas are few but, dang, when you need one, there is NONE better than this one!  And it goes very well with this banana bread recipe because it's kind of a slinky song.  You know, the kind that makes you want to move around in a bendy, twisty way - while eating a slice of this bread.  Not necessarily in a bite after bite fashion, mind you.  You'll take a bite, then pluck out a chunk of the candied ginger, savor that with a smile, maybe take another bite, then go after a little piece of chocolate.  M-m-m-m!  It's all about savoring - and slinky dancing - and enjoying the talents of Mr. Belafonte!

I sometimes feel like the banana boat worker in this song.  My family loves bananas, and I'm always buying them, but we go in these weird cycles where suddenly the banana consumption just stops!  Of course, I've just hauled home an "eight foot bunch" when we hit one of these mysterious lulls and, before you know it, I have bananas that are too ripe for anyone to want to eat, as is.

This used to send me into a panic - "Now, what am I going to do with all these bananas?!"  Then I discovered that you can easily freeze them.  Just throw them in a storage bag and toss them in the freezer.  They look nasty because the skins have turned black but, inside, they are perfect for whatever you're baking.  Let's be clear, though, that these bananas are just overripe, not rotten!

Yesterday I was looking around my kitchen and spied the last two bananas that were in the perfect condition for baking!  The weather outside made it a great day to be inside baking and a quick check of my pantry let me know that it was going to be a banana bread day!

I found this recipe years ago on Orangette and only tried it because she raved about it so much.  I'd never had candied ginger before and my mind instantly linked it to that dried candied fruit of fruitcake notoriety.    But, something about how she described it made me want to try it.  And, boy, am I glad I did!  This bread is nothing at all like fruitcake!  Chocolate and ginger and bananas are MFEO!  (For non-Sleepless In Seattle fans that means 'made for each other'.)

This recipe started my 'candied ginger love' and I've been putting it in anything that'll take it since!  It's especially good in my granola!  But this bread is what started it all.  Ms. Wizenberg also included the recipe in her book, A Homemade Life, which is such a wonderful read - it's a story book and cook book in one.  Love it!

This recipe also bakes into wonderful muffins - just so you know!

And now, I'm going to go enjoy a breakfast of this wonderful bread then watch Sleepless In Seattle with my daughter - because there's no going outside today, folks!

Banana Bread with Chocolate Chips and Candied Ginger
ever so slightly adapted from Glenn's Banana Bread recipe from Orangette
Printable Recipe Card
1 c. granulated sugar
1 large egg
1/2 c. (1 stick) unsalted butter, softened
2 ripe bananas
1/4 c. milk
2 c. (274 g) flour
1 t. baking powder
1/2 t. baking soda
1/4 t. kosher salt
1 c. chocolate chips
handful of candied ginger, chopped

Preheat oven to 350 degrees and grease a 9x5 loaf pan or prepare muffin tin with spray or paper liners.  It'll make about 6 muffins.

Cream the butter and sugar together in mixing bowl until light and fluffy.  Add the egg and stir to combine.

In a separate bowl, combine the flour, baking powder, baking soda, and salt and whisk to blend well.

In a small bowl, mash the bananas with the milk.


Add the flour mixture to the butter/sugar mixture in three parts alternately with the banana mixture in two parts in this fashion:

Add half the flour mixture, stir until just starting to incorporate.
Add half the banana mixture, stir until just incorporated.
Add half of the remaining flour, stir in like manner.
Add the remaining banana mixture, stir.
Add the remaining flour mixture, stir.

Stir in the chips and ginger pieces and lightly stir to distribute.


Spread batter in loaf pans or muffin tins and bake.  Loaves will cook for one hour.  Muffins for about 20 - 30 minutes.  Let cool, then remove from pan to continue cooling.


Monday, January 16, 2012

Ode To My Chocolate Chip Cookie


1, 2, 3, 4 by Plain White T's
I can't think of anything that a chocolate chip cookie can't fix or make even better.  I'm pretty sure that that is exactly what was on the minds of Plain White T's as they wrote this song.  It could very well have been titled "Ode to My CCC."  Broken hearts are mended and bad days ended with one little bite.  Happy times are celebrated and memories created with the making of a simple batch.  Hopes are sent soaring and children become adoring with just one heady whiff of their aroma.  Even a marginal batch of chocolate chip cookies can work miracles.  But when you have a really, really terrific recipe - like this one - well, I'm thinking that world peace might not be out of the realm of possibilities.  As the T's say, "There's only one thing, to do, three words, I love you!"

Do you even remember the first chocolate chip cookie you ever had?  I don't.  Chocolate chip cookies are as much a part of the fabric of our lives as the air that we breathe - and I certainly don't remember my first breath!  And I, like everyone else I know, have been on a quest to find THE recipe.  The recipe that makes you hap-hap-happy!

The hunt is different for all of us because we all have different expectations of what that perfect chocolate chip cookie should be.  You have the crispy fans.  You have the ultra-soft fans.  You have the "tons of chips" camp vs. the "there's too many chips in this here cookie" fans.  Some want milk chocolate, some want dark chocolate, and then there's those that want some of both.  Regardless of our preferences, though, we all want chocolate chip cookies.  And we want them NOW. 

My personal criteria for a good chocolate chip cookie, regardless of how it's dressed up is:
1.  Initial crunch factor - it should have a delicate yet discernible crack when your teeth sink in.
2.  Soft center - the initial crunch should yield to an impossibly soft center where the melty chips live with whatever other delectable tidbits you threw in.
3.  Chocolate - good semi-sweet chocolate chips.  I will agree to add in some milk chocolate chips now and then to appease my husband, but my own preference is the darker chips.
4.  Flavor - the heady flavor of real vanilla paired with almond extract is euphoric - and a must, in my book.  


I've 'dated' several recipes over the years, settling down with one for awhile until another one comes along, catches my eye - and tastebuds - and steals me away.  Then I found this one at Orangette.  It piqued my interest in so many ways - the use of two different kinds of flour, the sprinkling of sea salt, the 'curing' of the dough, the use of weights instead of volume.  Well, I fell in love and proposed marriage after our very first batch.  Things have been great!  It's still my go-to recipe.  

People have asked me about my recipe and I've explained about the different flours, etc. and I've noticed it kind of intimidates folks.  Most people want a more straight forward approach, I suppose.  So I've been tampering with the recipe a bit, 


trying to make it more user friendly and have come up with what I think is a really wonderful version.  Call it our "baby."  Go ahead and take it for a stroll!  Bounce it on your knee and get to know it!  I'm sure you'll love it as much as I (we) do! 

I still say that curing or aging the dough is key.  I even did my own experiment.  I made this recipe, scooped them out onto a sheet tray, covered well with plastic wrap, and chilled in the refrigerator.  Then, each morning, for three days, I pulled out a few and baked them.

This is day one.  It cooks up lovely and tastes great.  


Day two - still cooks up wonderfully but not much noticeable difference in flavor.


Day three - same bake time.  The texture is supreme and the flavors are now beginning to mellow a bit.


I can add to my experiment the information I have gathered from past baking experiences.  When I usually make chocolate chip cookies, I start by freezing the scooped portions, then remove them from the cookie sheet and place them in a gallon-size freezer bag.  The dough continues to age but at a slower rate.  They last for a couple months in the freezer and I can tell you that those cookies that get baked up last have the most wonderful and deepest flavor of all.  I am a big fan of chilling the dough.  It's benefits far outweigh the patience required to have to wait.  Don't like waiting?  Then go ahead and make up an extra big batch and freeze the scooped portions!  You will always have delicious cookies no more than half an hour away!  When your supply is running low, time to crank out another batch!

In today's recipe I give them an especially delicious combo - coconut and toasted pecans!  "There's only one way to say those three words and that's what I'll do - I love you!"

Coconut Pecan Chocolate Chip Cookies
makes 3 1/2 dozen
Printable Recipe Card
10 oz. unsalted butter, softened (2 1/2 sticks)
10 oz. light brown sugar (1 1/4 c.)
8 oz. granulated sugar (1 c. plus 2 T.)
2 large eggs
1 1/2 t. vanilla extract
1 t. almond extract
15 oz. all-purpose flour (3 1/3 c.)
1 1/4 t. baking soda
1 1/2 t. baking powder
1 t. kosher salt
2 c. chocolate chips
6 oz. pecans (1 1/2 c.), chopped and toasted
6 oz. shredded coconut (2 c.)

In a large mixer bowl, cream together the butter and sugars until light and fluffy - about 4 - 5 minutes, scraping down the sides of the bowl and the paddle occasionally .

While the butter and sugar are creaming, measure out the flour, baking soda, baking powder and salt in a separate bowl, whisking together until well blended.

When butter and sugars are fluffy, add the eggs one at a time, mixing well after each egg.  Add the vanilla and almond extracts and mix to incorporate.

Add the dry ingredients all at once and let the paddle make a couple turns to start blending them in.  Stop the mixer and add the chips, pecans, and coconut.  Turn on the mixer and blend until the dough just comes together.

Scoop onto a sheet tray into equal portions using an ice cream scoop (for regular-sized cookies I use a #24 scoop.)  Chill for at least 12 hours or freeze then bag them.

Preheat oven to 350 degrees.  Place portions on a sheet tray lined with parchment paper.  If chilled in refrigerator, bake for 7 minutes, turn the pan, then another 7 minutes.  If baking from frozen state, bake for 8 minutes, turn, bake another 8 minutes.

A quick word about baking by weight.  Everyone scoops differently so one cup of flour for one person could have much more or much less than another person's one cup of flour.  The ONLY way to make consistently good baked items is to measure by weight.  Food scales don't have to be super costly.  Do yourself a favor and start weighing your ingredients!

Thursday, January 12, 2012

I Found Love


I Found Love by The Free Design
Sometimes things in the universe collide and bring inspiration.  That very occurrence is what has led to today's post.  You will remember my sweet friend, Erin, who came over during the holidays to learn how to make pie dough and we ended up sharing a lunch of Christmas Quiche.  Well, I recently heard, via her mother, that Erin became engaged shortly after returning to school!  There's a very lucky young man out there named Jordan who's a genius because he recognized a great catch when he saw one!  Congratulations to you both!  Along with this happy news, I started seeing the appearance of little bags of Meyer lemons at the store!  This always makes me want to raise my hands in the air and give a little dance, right there in the produce department!  Sweeter than a lemon, yet more tart than an orange, these little beauties make winter bearable!  I wanted to think of something to make that would mirror just how happy I was inside for all the great news I was enjoying!  I needed a skippy song.  I needed a song that sings about things like "sunlight and flowers," "tootsies tapping," "soft summer showers," and "fingers tingling."  Even if it IS January!  


About the only thing that can tempt me away from chocolate is lemon - namely Lemon Meringue Pie.  Like my grandfather, I adore this pie.  

Alas, I'm trying really hard to stick to my resolution about curbing those calories.  All together now - "UGH!!!"  I know you all feel my pain.  So what to do when you see these beautiful lemons on the shelf and you just HAVE to have pie or something delectable!?

Why, you have it!  Only a smaller portion of it!

As I was pondering my quandary I remembered this mini-cheesecake pan I'd purchased awhile ago but had yet to use.  It has little removable plates on the bottom of each cup for easy removal.  So, a cheesecake then?  No.  I really wanted my pie!  So I started looking through the pantry and found these ginger wafer cookies and some almonds.  I realized I could make tiny little pie-lets with a crumb crust. Minimal baking.  A little time over the stove - but well worth it for a taste of my precious favorite!


I knew the filling would be lemon curd so I just needed to figure out how I was going to top it off.  I opted to use a meringue topping so it would be as close to a real pie as possible.  However, if making the meringue kinda scares you, go ahead and opt for whipped cream.  You can even purchase the lemon curd, I guess, but then you'd be missing out on what brought us to this point - the Meyer lemons!  Be brave!  It's not difficult at all!  And you'll be putting it through a strainer so any lumps will be gone forever when you're done!  Come on!  One of these little cuties awaits!  Let's get crackin' . . . . eggs!  Ha!


Meyer Lemon Pie-lets
makes 12 small pies
Printable Recipe Card
Ginger Crumb Crust:
1 sleeve ginger wafer cookies (or use grahams, about 1 1/2 - 2 c. crumbs or 24 crackers)
1/4 c. sliced almonds
2 T. sugar
pinch salt
1/4 c. butter, melted

Place the cookies, almond, sugar, and salt in the bowl of a food processor and pulse until an even crumb.  Add the melted butter and pulse until well mixed and the crumbs compact when pushed between your thumb and finger.

Lightly spray a mini cheesecake pan with removable bottoms with cooking spray.  Place 2 T. of crumb mixture in each round and tamp down.  That tamper in the photo is one I bought from a Pampered Chef party but you could use the bottom of a lid or a small glass or even a pill bottle!


Bake at 350 for 5 minutes.  Remove from oven and cool.

Lemon Curd:
2/3 c. butter (150 g)
1 c. sugar (180 g)
6 fl. oz. lemon juice, fresh
zest of 2 lemons
7 egg yolks (140 g)

In a saucepan (not aluminum) combine half the butter, half the sugar, the lemon juice, and the zest.  Stir gently and bring to a boil, making sure to dissolve the sugar.

Place the remaining sugar and the egg yolks in another bowl and stabilize using a moist towel or a rubber mat.  Whisk to combine.

When the lemon juice mixture has come to a boil, remove from heat and very slowly add to the egg yolk mixture, whisking constantly.  When you've added about a third of the liquid, whisk contents of the bowl back into the pan with the rest of the lemon mixture and continue cooking, stirring constantly with the whisk, until it comes to a boil.  Stir in the rest of the butter.

Strain the custard through a sieve into a bowl, working it through with a spatula.  Spoon the curd over the cooked crust, filling until it's almost to the top of the opening.  Cover and chill.  If you have any curd remaining, place plastic wrap directly on top of the surface of the curd and refrigerate.  This keeps a "skin" from forming.

Meringue topping:
7 egg whites
1 3/4 c. sugar
1/2 t. cream of tartar
2 t. almond extract

Create a double boiler by placing a large metal bowl over top of a large pot which has about 1 - 2 inches of water in it.  The bottom of the bowl should not touch the surface of the water.  Bring the water to a simmer.

Combine the egg whites and the sugar in the bowl that is to sit on top of the large pot and whisk together.  When water begins to simmer, place the mixture over the top of the pot and, using the steam from the water, whisk constantly and heat the egg and sugar mixture until it reaches 140 degrees.  The sugar will be dissolved and the mixture will begin to froth and foam.

Empty contents of bowl into the large bowl of a stand mixer fitted with the whip attachment.  Beat the egg white and sugar mixture on high until mixture starts to thicken.  Add the cream of tartar and continue beating until stiff peaks form.  Add the almond extract and beat just until blended.

Place meringue in a pastry bag and, when ready, pipe onto the top of the little pies.  Toast the top by placing under the broiler for just a couple minutes.  Keep a close watch on them - they tend to want to burn!  Push each pie out of the mold, remove the bottom disc, and enjoy!

Chill pie-lets and serve with toasted almonds and more lemon zest!  I found love - and so will you!


Monday, January 9, 2012

Thai and I


Gonna Make You Sweat by C+C Music Factory
I'm not a huge spicy food fan but I'd have to classify this soup as spicy.  Good news - you can completely control the amount of spice!  Having said that, though, I love the "warmth" that comes off of this soup.  The Thai flavor profile is exciting, interesting, and very flavorful.  It WILL make you excited enough to dance, even if it's a head-bob while sitting in your chair.  The song choice today is to make that dance a fun one!  Caution: if you take the leftovers to work (which I know you're gonna want to do) you might want to take some to share.  You know, so you won't have to dance alone!


I had Thai food for the first time a few years ago.  One of my friends wanted us to try a place in town so our little group went for lunch one day.  Ummmm.  Not a fan.  I know it's not the best idea to use non-appetizing descriptors in a food blog, but, let's just say - there were odors more closely associated with a gym locker room than a restaurant and, well, I just couldn't get past them.  They say you eat with your eyes first, meaning, that food that looks appealing has already won half the battle!  On this occasion, though, my eyes kept getting interrupted by my nose, which was saying, "Hold on, Nellie!  There's no way you're getting that past me!!"  I didn't want to appear rude so I ignored my nose and ate - sparingly.  My nose, it appears, was right.  I left with the determination that Thai and I would never again meet!

Then, a few years later, another friend, of the same group, asked me to join her one day for a Thai lunch at another place in town.  I confided how I wasn't sure I was up to it after my last experience.  She assured me that this was authentic and very good.  I trusted her.  And I'm glad I did!  It was lovely!  I particularly loved the soups - and the pleasant aroma of the place in general!  Ok!  Thai and I were now better acquainted - although I have to admit some hesitancy still remained.

Shortly after that, while attending culinary school, I watched as one of my instructors demonstrated the prep for a Thai dish that was to be on that day's menu.  I firmly proclaimed that I would not be tasting that particular dish.  He gave me a glance out of the corner of his eye and inquired as to the reason for such resolution.  I explained my trips down the Thai lane and we bantered back and forth about it, ending with my decision still rooted firmly in place.  But, then, you know what he did?  With his prep all done, he started the cooking part of his dish.  He heated that sauté pan and started throwing in garlic and ginger, and chili paste, and the aromas that wafted down to my end of the station were heady and enticing.  He made a bowl for himself and one for my teammate, Brian.  The instructor left, but I watched Brian chow his down.  And I was jealous.  Because it looked wonderful, smelled divine, and I could tell it tasted good, too.  I sheepishly went to the instructor and asked if he wouldn't mind preparing one for me after all.  Of course, he had to give me a hard time first - and I thought he wasn't going to do it at all - but he eventually did.  And I would say my eyes were opened to how lovely and satisfying Thai food could be.

This soup is another find in that Cooking Light magazine I was reading on my way home from a holiday trip.  It was right up there on the excitement scale along with the rice pudding from last post.  The first thing I wanted to do when I tasted it was share.  And that's what I'm doing today.  I modified it just a bit, cutting the amount of chili paste in half, to tailor it to my non-spicy taste but it ended up being plenty spicy even so.  You can use that as your guide.  Oh - and another tip - I would advise NOT standing directly over the pot when you add the sambal oelek (chile paste).  Cough!  Cough!  Just sayin'!

Some of these ingredients might not be familiar to you but you'll be able to find the chile paste, fish sauce, and coconut milk in the Asian food section at your grocery store and the ginger and lemongrass in the produce department.  I used a pre-roasted chicken from the deli as well!  It made this dish a super quick fix!  "Everybody dance now!"

Thai Coconut Chicken Soup
adapted from Cooking Light
serves 4
Printable Recipe Card
2 t. canola oil
1 c. sliced mushrooms
1 red bell pepper, sliced
1 inch peeled fresh ginger, minced
3 garlic cloves, minced
1 (3-5 inch) stalk lemongrass, halved lengthwise
1 t. sambal oelek (ground chile paste)
3 c. chicken stock
1 1/4 c. light coconut milk
4 t. fish sauce
1 T. sugar
2 c. shredded, cooked chicken breast
1/2 c. green onion strips (just take the green stem and pull small strips down, like string cheese)
3 T. fresh cilantro leaves
1 lime, cut into wedges

Heat a large pot over medium heat.  Add oil and stir to coat.  Add the mushrooms, bell pepper, fresh ginger, and lemongrass and cook for 3 minutes.


Add the chile paste (stand back!) and cook for another minute.  Add the chicken stock, coconut milk, fish sauce, and sugar and bring to a simmer.  Reduce heat to low and simmer for 10 minutes.

Add chicken  and cook until heated through.  Discard the lemongrass and ladle the soup into bowls.  Top with the green onion strips, cilantro leaves, and a lime wedge.  It is key that you don't forget to use the lime wedge!  Give it a squeeze over the bowl and dig in!

Thursday, January 5, 2012

The Proof of the Pudding


Good Day Sunshine by The Beatles
For all the reasons that this rice pudding makes me happy, I needed a song to match the mood and this song does the job fab-ulously!  I love songs that make me want to skip and dance about!  I love songs that give me an inner sense that all is right in the world and, despite the news that gets the largest chunk of "air time," I still feel that the world is a mostly good place - that people love more than hate - that acts of kindness far outnumber the acts of hatred - and truth still trumps guile.  This song provides the perfect soundtrack to enjoy the solace found in this bowl - of love.

On Sunday evenings, my mother would put a casserole dish filled with rice, milk, and spices into the oven, turn it on low, and we'd go off to our evening church service.  Upon returning, I'd race to get through the door to get hit with that heady aroma that that dish of simple ingredients created in our absence.  Cinnamon and cream had warmed to perfection.  There was no need to nag us kids to get our coats put away and get to the table.  The pudding did the bidding itself.  As if it were yesterday, I can picture my siblings and I around the table, enjoying this treat.  

Of course, if Mom snuck some raisins in there, there would be a moment of outcry.  I was not a fan of any dried fruit at that stage in my life and, like my oldest brother, Ed, I particularly didn't enjoy finding raisins in any of my food - be it pudding, oatmeal, or cookies, thank you very much.  But I'd work my way around the intruders, if present, and enjoy the rest of the goodness.  I don't know if the others enjoyed the pudding as much as I did, but, for me, it remains a head-turner to this day.

Which is why, when I saw this recipe, I did a double-take.  Nay - I did a triple-take!!  The fact that it was rice pudding is what made me go back and scan the recipe and then, when I saw my newest most favorite ingredient, "cardamom," my heart leapt with joy and made me go back and thoroughly read the recipe.  What?  No oven involved?  No long wait?  I COULD ENJOY THIS BOWL OF HUGS IN A MATTER OF MINUTES?  Oh yeah - I'm making this NOW!  Well, I was on a plane at the moment, but I knew that as soon as I got home I was going to make it!  Well, but by the time I got home I had the flu.  But, the minute I was better, I made this pudding!  And it was exactly what I needed!  It is so delicious - and it's from Cooking Light magazine so wahoo! for helping us keep those healthy resolutions!  I am eating this for my breakfasts!  Don't let the "pudding" word trick you into thinking this is only a dessert!

The recipe calls for stirring the coconut into the pudding.  I opted to toast it and sprinkle it on top - why would you pass up the opportunity to add such a wonderful element of flavor?!  As a matter of fact, while I was at it, I toasted a bunch of coconut in the oven at 350 for about 10 minutes, cooled it, and am keeping it on hand to add to whatever I deem worthy and deserving! 


Go ahead and give it a try!  "The proof of the pudding is in the eating!" Miguel de Cervantes in Don Quixote 
I guarantee it'll make you .....


Rice Pudding with Coconut
serves 6
slightly adapted from Cooking Light
Printable Recipe Card
2 c. cooked rice
1/2 c. sugar
3 T. cornstarch
1/4 t. salt
1 1/2 c. 2% milk, divided
2 large egg yolks
1 c. light coconut milk
1 t. vanilla extract
1/4 t.  ground cinnamon
1/4 t. ground cardamom
chopped pistachios
toasted coconut
toasted pumpkin seeds

Combine sugar, cornstarch, and salt in a bowl.

Add egg yolks to another bowl and whisk in 1/4 c. of the milk.  Whisk in the sugar mixture until blended and set aside.

Place the remaining 1 1/4 c. milk and the coconut milk in a saucepan and bring just to a boil.

Stabilize your bowl of egg and sugar mixture by placing on a moistened towel or rubber mat, and, while whisking, very slowly pour the hot milk mixture into the egg/sugar mixture.  You want to go slowly so you don't curdle or solidify the eggs.  By working slowly you will bring the temperature of the eggs up gradually, avoiding this.

Once the two are combined, pour the mixture back into the saucepan and bring to a boil again, stirring constantly.  Continue to stir and cook for 1 minute.  It will become quite thick and your spoon will leave a path through the custard.  Remove from heat and stir in the cooked rice, vanilla, cinnamon, and cardamom.

When serving, top with just a little of the toasted coconut, pistachios, and pumpkin seeds.  I also drizzled a tablespoon of the coconut milk around.  M-m-m-m-m!