COOKING CLASSES

Thursday, September 29, 2011

"Platters" of Peanut Butter Cookies


Song Pairing:
Only You by The Platters
A classic love song for a peanut butter cookie?  When it's the "only" recipe I've ever really enjoyed, then YES!  A love as single-hearted and devoted as mine is for this particular concoction deserves a melody as timeless and true.  My daughter had me second-guessing - thinking that maybe I Only Have Eyes For You by The Flamingos might be the better choice, with all the do wop she bops.  I considered changing for just a moment.  But, then, I listened to The Platters one more time and knew for sure.  When I eat this cookie, I want to throw back my head and howl out "you're my dream come true - my one and only yoooouuuuu!"


A peanut butter cookie was about the only cookie I was known to say "no" to growing up.  Well, that and anything with nasty orange marmalade in or on it.  Peanut butter cookies were too dense, too "in your face," and always too dry.  It was the dry part that was the kicker.  Even with a glass of milk, they just sucked up all the moisture and didn't leave anything behind to give you that refreshing feeling you're looking for after a treat of milk and cookies.  Even today, I will often refuse an offer of this particular cookie.  If I didn't make it, using my trusty recipe, I'm simply not interested.

I found this recipe through a friend, waaaay back in the 80's.  My friend had me and my little ones over for a play date and she had just baked a batch of these.  I tried to politely refuse but she guaranteed me that these were the best ever.  She said something like, "You know how peanut butter cookies usually are dry and really dense and "in your face?"  Well, these aren't!  I promise!"  It's like she read my mind!  I didn't want to be rude so I tried one.  And she was right!  The initial lightly crisp exterior was wrapped around a light and airy, yet creamy peanut butter center.  I was so shocked that I had to eat another!  Without any milk!  And then I snuck a few more into our diaper bag for the drive home!  Ok - so she gave them to me - but, best of all, she gave me the recipe, too.

And you ask, "What's the big difference about this recipe?"  I'm pretty sure it's because it's made with some of this:


Powdered sugar!  Genius!

This would account for the "melt-in-your-mouth" sensation.

Even the dough is fluffy!  I always scoop my cookie dough with ice cream scoops to keep portions even.  This allows for even baking as well as avoids the "their cookie is bigger than mine" dilemma all parents just love!  For large man-size cookies I use a #12 scoop.  For regular-size cookies I use a #24 scoop.  


They look so cute! 


Don't forget to mark them!


But today I had an idea come into my head so I left some of them without the fork marks.

Why do I have them so close together?  Because after I scoop them I freeze them.  If I'll be baking them that day I'll just put them in the refrigerator to chill well.  But most often I scoop and freeze.  You just need to be sure to wrap them well.  After they're frozen I can take them off the tray and pop them into gallon-sized freezer bags.  I find that this really helps the cookies keep their shape.  It doesn't take long before they're ready to bake when you pull them out of the freezer - about as long as it takes the oven to warm up.


And this is the idea I had for the ones I didn't mark with the fork - chocolate hash marks!!  I just melted some chocolate in the microwave quickly, stirring every 15 seconds.  I put it in a disposable piping bag, snipped off the end and crossed away!  A few minutes of "time out" in the fridge set the chocolate up nicely and - as you can see - they were ready to sample!  "Only yooouuuu!  Can make this world seem right!"  Love the peanut butter/chocolate combo!

The recipe calls for shortening.  I conducted an experiment last week and made two batches - one with the shortening and one with butter.  My daughter was Team Butter while my husband was Team Shortening - it was a tie.  So I called a neighbor guy to come over and give his vote.  He approached it like a pro - tasting, smelling, touching.  He wasn't told which was which to make it a true scientific project.  He signed with Team Butter!  It's good to have such helpful neighbors, right?  Thanks, Jordan!

Personally, I was shocked to find myself weighing in on Team Shortening's side.  It had just a bit more crunch on the outside which I found very pleasant.  You decide for yourself which one you like! 

Peanut Butter Cookies
Printable Recipe Cards
1 c. shortening or butter or a little of both! (215 g)
1 c. peanut butter (258 g)
1 c. sugar (200 g)
1 1/2 c. powdered sugar (180 g)
2 eggs
2 t. vanilla
2 c. flour (250 g)
2 t. baking soda
1 t. kosher salt

In a large mixing bowl, cream the shortening (butter) with the sugars until light and fluffy.  Add the peanut butter and mix until well combined.  Add the eggs one at a time, mixing well after each.  Add the vanilla and mix.

In another bowl, combine the dry ingredients and whisk well.  Add the dry ingredients all at once to the wet ingredients and mix on low just until combined.  Do not over mix. 

Line a sheet tray with parchment paper and scoop out cookies, keeping about 1/2 inch between.  With your hand, gently press each portion slightly.  Mark with fork tines, giving them a criss-cross pattern.  Wrap with plastic and freeze.

Preheat oven to 350 and pull cookies from freezer and place on parchment lined trays, spacing about 2 1/2 inches apart.  Bake for 6 minutes, turn, and bake 6 minutes more.  These are soft so let them sit on the sheet tray for at least 5 minutes before removing to a wire rack to cool completely.

Makes about 32 regular sized cookies.

Monday, September 26, 2011

Edible Surprises


Song pairing:
Anticipation by Carly Simon
This song was chosen based on my favorite compliment of the evening - "It's just like Christmas morning!  Each layer is like opening another gift - and you can't wait to see what's waiting in each one!"

I love it when experiments and hunches are both successful and correct!  As in this lovely Pineapple Orange Trifle.  It's a journey through flavors and textures - the pineapple cloud on the top, which gives way to a melt-in-your-mouth burst of ginger, which leads to the tunnel of vanilla orange creamy pudding, which rests on top of the cubes of moist cake with orangey bits, which ends with a triumphant shout of berry cherry jelly.  This all happens in the space of about four inches, mind you.

I recently was asked to help feed 250 women a lovely and elegant dessert type of refreshment.  I racked my brain for options - my mind taking the usual route of elimination.  Come along and I'll share what a journey like this looks like inside my brain.

First stop - something chocolate.  Hmmm.  Maybe not this time.  The budget was pretty limited.  Every time I let my mind wander around in the chocolate sphere too long I always ended up somewhere either too  expensive or too involved.  

Second stop - heavily influenced by recent food shows on television.  I thought that creating pavlovas would fit the requirements neatly.  Elegant? Yes!  Lovely?  Indeed!  Topped with cream and a simple fruit medley, they would be wonderful!  The meringues would store well and I could make them over a period of days.  But I was probably the only one on the committee that would feel comfortable making them so did I really want to pipe out and bake 250 pavlovas?  Probably not.  So I continued to brainstorm.

My third brain stop - a sudden memory of a cake I'd had earlier in the summer that featured pineapple and orange flavors.  It was beautiful and light and airy.  It involved using mixes, which I have tried to avoid since learning so much in culinary school.  I'm more than capable of baking a beautiful cake and cooking a sumptuous pudding from scratch, and prefer to do so.  However, looking at the scope of the project, I had to swallow my pride and look at logistics.  By using mixes I could involve more people as most would probably balk at being asked to make such things from scratch.  Another bonus - many of the components could be made ahead of time and frozen.  The more time I spent considering this option, the more it seemed to make sense.  I would deconstruct the cake in a way to make it seem more special in its presentation.

The ultimate destination of my mind's wanderings ended up turning the lovely cake into a trifle - a sort of parfait of the original textures and flavors - but with added elements I thought would bring both additional eye appeal and flavors.  The original cake had mostly pale yellow hues.  I wanted something with a little more pop to it.  All I had to do was look around my kitchen to know that the color I would be looking for was something red!  I love that combo - yellow/gold hues with pops of reds.  It's happy - in both home decor AND food!  My favorite red food at the moment, raspberries, would work  perfectly.

I also thought it needed a surprise layer.  Something crunchy?  An unexpected flavor?  A cookie crumble?  Would that be a vanilla wafer?  A shortbread cookie?  What about a gingersnap?  Do others like gingersnaps as much as I do?  The ginger would definitely be a surprise - both in flavor and texture but it would also marry well with all the other flavors in the trifle.  I spent about two days agonizing over whether or not people would embrace the ginger love.  I did a taste test to settle the dispute.  DI-VINE!  I had to do it.  Had to!  I was happy to find that it ended up being the layer that received the most attention - the positive kind!  Yay for hunches!

Enjoy this with forced patience and anticipation.  Serve it to guests and listen as they "ooh" and "ahhh" over each new layer.  Close your eyes and picture Christmas mornings - and thank yourself for the perfect gifts!  And so as not to be "keeping you wa-ay-ay-ay-ting" ~ here's the recipe!

Pineapple Orange Trifle
Bottom layer:
Red Raspberry jam - figure 2 T. per trifle
Cherry Juice concentrate
       Heat jam in a saucepan on stove top over medium heat - just until it starts getting liquid.  If it has seeds, you might want to pass it through a sieve to get rid of them - I did!  Add a little cherry juice concentrate to help the mixture stay loose after it's cooled - I used about 1/4 c. concentrate per 2 lb. tub of preserves.  Go ahead and make up a big batch and keep on hand in a squeeze bottle for ice cream or savory sauces!

Second layer:
Yellow cake mix
4 egg whites
1/2 c. applesauce
1-11oz. can mandarin oranges, NOT drained
      Mix together in a mixing bowl for two minutes.  Spray a cookie sheet and fill with the batter, spreading it evenly.  The cake doesn't rise much so don't worry about it spilling over the sides.  Bake in 350 oven and start to check after 15 minutes.  It's done when it springs back from your touch and when a toothpick inserted comes out clean.  Let cool.  Wrap and freeze.  After it's frozen, remove, unwrap, and, using a paring knife, cut the cake into 1/2 - 3/4 inch cubes.  Use a spatula to loosen the cubes and toss around a bit.  Let sit out to dry the cubes a bit - 4 hours.  Scoop cubes into gallon sized freezer bags if not using right away or use what you need and freeze the rest.

Third layer:
1 package vanilla pudding, the cooking kind, NOT instant
3 c. milk, I used skim milk - not a problem
      Make according to package directions.  PLEASE - resist the urge to use instant pudding for this layer.  Instant pudding has a different flavor profile - more high notes.  The cooking mix has more mellow notes which serve to balance the sweetness in the overall dish.  Trust me.  
      To use the left over egg yolks from the cake layer, I made an orange curd and mixed it in with the completed and cooled vanilla pudding.  You can reach the same effect by simply adding some orange zest to the pudding.  It adds interest.  But plain is fine, too!

Fourth layer:
Thin gingersnaps, such as Anna's Ginger Thins - figure 2 thins per trifle
      The easiest layer!  I found mine at Costco.  Hope you can as well!  If not, I found them on Amazon, too.

Top layer:
1-8 oz. tub frozen whipped topping, such as Cool Whip - can use reduced fat as well
1-20 oz. can crushed pineapple, NOT drained
1-1 oz. box of sugar-free, fat-free vanilla pudding - or use regular instant pudding
      Mix all together in a large bowl.  I put mine in a pastry bag without a tip and cut a 1" opening and piped it around and around, working from outside to inside.  

These can be made and stored, covered, in the refrigerator for 4 hours.

Thursday, September 22, 2011

Just Knead It!!!

Let's make pizza dough!

Song Pairing:
Beat It by Michael Jackson
This song is perfect for two - no, maybe more like three - reasons!  E-man, who is four years old, is here for a visit and it's one of his favorite songs to dance to.  I find this super adorable because it was also one of his daddy's favorite songs to dance to when he was also four years old.  He was the world's youngest self-proclaimed expert on break dancing.  In addition to these two great reasons, I suggest we take a tip from Weird Al Yankovich and substitute the words "Knead it" for, of course, "Beat it."  Whether you're kneading by hand or machine just use this song as a timer!  Get your dough assembled, press play, and "Knead iiiiiiit!!!  Knead iiiiiiiit!!!"  When the song is done, you should be, too!  Oh - and don't forget to dance a little while you're doing it.  Just don't break dance.  According to E-man's daddy, "Beat It isn't break dancing!" 

Autumn is knocking on our door and has me thinking about cranking up the oven for pizzas again.  And when I say crank it up, I mean wayyy up!  To 500 degrees!

Pizzas are one of the best foods to make when you've got company.  It is a meal and an activity all rolled into one.  You can have personal pizzas for each guest or assign each guest a sector of the community pizza.  Set out the topping choices and then let the fun begin as each one custom designs their pie.

I have extra special company this week.  My son and his family came to visit us and my oldest grandson, E-man, was super excited to make his own pizza tonight!  This is pretty much how the evening went ~

I made some pizza dough - it didn't take long -


After leaving it alone for about 30 minutes it did this -


It's a very happy dough!

We divided it up and I gave E-man his own hunk of dough.  We shaped it onto a baking stone like this -


Time for toppings!

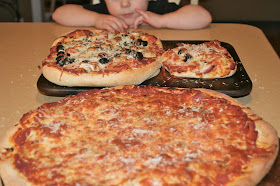
I provided shredded mozzarella, black olives, pineapple tidbits, canadian bacon, pepperoni, and fresh sliced mushrooms.  I found it very interesting that, of all those choices, he went for this one first!

It's documented!  Being a mushroom lover myself, I'm rather proud that he shares this appreciation with me!

It was fast and furious work and soon his masterpiece was ready for that fiery furnace - aka, my 500 degree oven!  I still needed to complete mine though.  As I said, I'm an avid mushroom fan and had plans for lots of mushrooms and black olives and not much else!
Hey!  Wait a minute!  Where did all of that pineapple and canadian bacon come from?!  Well, let's look back a frame or two and see if we can figure it out -
Aha!  One of those hands is a little smaller than the other, don't you think?  Seems as though I got some help!  Of course, Grandma let it stay just the way it was!  And enjoyed every bite!

And this is what happens when you turn your back to put them in the oven -

Cheese?  What cheese?

About ten minutes later -

Yes, he's drumming his fingers!  Grandma - he wants to eat!  Put away the camera!


And that's how you make pizza disappear!

I guess I'm not the only one who's been thinking about pizza lately.  Go here and find my friend's recipe for a Jamaican Jerk Chicken pizza topping.

And here's how to make super easy pizza dough, ready to use in 30 minutes or later that day - or even later in the year!

Pizza Dough adapted from a recipe by Emeril Lagasse
Printable Recipe Card
2 1/4 t. dry yeast
1 c. very warm water
1 t. sugar
2 1/2 - 3 c. bread flour (350 g)
1 1/2 t. kosher salt
1 1/2 - 2 T. extra virgin olive oil

In a large mixer bowl, add water and sugar and give a quick stir to distribute the sugar.  Sprinkle the yeast over the surface and give another quick stir to mix it in.  Let sit a few minutes while you measure out your flour and salt.  This will give the sugar and yeast time to visit and see if they're going to hit it off.  If, after a few minutes, you see the yeast happily popping to the surface of the water, you know it's all good and can continue.  If nothing is happening, maybe give it a few more minutes.  If it's STILL quiet in the bowl, I'd just assume that your yeast isn't going to work for you and start over - with new yeast, of course!  I keep my yeast in the freezer and have never had trouble.  Some people keep theirs in the fridge.

Assuming your yeast is happy and compliant, add the flour and salt and stir, if doing by hand, or mix on medium speed, if using a stand mixer and dough hook.  Add the extra virgin olive oil and stir or mix until the dough comes together.  At this point you can turn it out and begin to knead (with music, don't forget!) on a lightly floured surface or continue to knead with a dough hook on your mixer for about 4 - 5 minutes.  The dough should feel similar to play dough.

Using olive oil, coat a clean bowl that's a little more than twice the size of your ball of dough with some olive oil and place your dough in, giving it a turn to coat the top with the olive oil.  Cover with plastic wrap that's been sprayed with cooking spray so the dough doesn't stick.  Find a warm and quiet place where it won't be disturbed and let it rise for about 30 minutes or until double.

When a recipe tells you to "punch down" dough, I think too many people take this to heart.  I know I sure used to!  But my baking teacher instructed us that you don't need to be violent!  Simply prepare your surface with a light dusting of flour, invert the bowl, and let the dough plop out.  It will deflate on it's own - peacefully.  Divide into required portions if making individual pizzas or keep as a whole.  This recipe makes enough for one 14" pizza.

I like to use baking stones but you can also use a cookie sheet if you prefer.  Lightly coat with cooking spray and dust with cornmeal.  Roll or gently work the dough into your desired shape and top as desired.  Bake for 8 - 10 minutes - until cheese starts to turn golden.  Let cool about 5 minutes and enjoy!

If you like, make the dough early in the day, place in the oiled bowl, cover and store in your fridge.  The cool temp will retard the rising action and your dough will be ready that evening!

To make several batches for future use you can either make the dough to the rising stage and freeze in balls or let rise, shape into pizza rounds, place on sprayed parchment lined sheet trays, cover and freeze.  When frozen solid, remove from sheet trays and wrap each round tightly in plastic wrap.  When ready to use, simply pull from freezer in the morning and let thaw in refrigerator on cooking sheet to be ready for dinner.

Monday, September 19, 2011

Please Pass the Biscuits!

Song Pairing:
I Love You Always Forever by Donna Lewis
I feel kind of bad telling you how to eat your food, but to get the most out of the pairing, just try this!  Take your nice, hot biscuit and get it all buttered up.  Add some honey or jam or whatever and push the play button.  As Donna starts singing to you in that breathy kind of voice about "standing in a timeless dream" and how she's "lost in a deep cloud of heavenly scent, touching, discovering you" - that's when you take your first big bite.  BIG bite!  The butter is everywhere and you close your eyes because you just have to.  Chew a little.  Then when the beat kicks in, start your happy dance.  You know you want to!  If your'e a little shy, just go ahead with the head bop for now because by the time you've gotten to the second or third repeat of the chorus, you'll be ready for reckless abandon!  Kitchen dancing!  It's the best!  Grab whoever is around and have them join you!  Postman, meter reader - give them a biscuit and share the joy!


The title of today's post is probably the most repeated request at my childhood dinner table.  And for good reason!

Just look at that picture!  Before you sits one of life's true blessings.  It's in the Top Ten list of my comfort foods - probably even the top five, and is most definitely on my "last meal" menu.  Does anyone else do this or am I just a little morbid and dark sometimes?  You know- if you knew when your last meal was going to be before you left this existence - say, if you had been really naughty and were on death row or something.  Not that I'm contemplating doing anything!  It's just that when I see this in the movies, it has caused me to reflect and try to put together what my last meal would be - and these biscuits would be part of that meal!

Growing up we ate plenty of biscuits - and I say this with a most joyful heart because my mother just happens to be the best biscuit maker in the world.  Hands down.  No arguing allowed.  My absolute earliest memories of her in the kitchen are those of her making these clouds of utter satisfaction.  Always being of short stature, my eyes could barely clear the top of the kitchen table, even on tippy toes.  But I would always watch with fascination and anticipation.

However, in all my 18 years of living at home with my parents, I was never once relegated the task of making the biscuits.  I was the chopper, the stirrer, the boiler, the table setter, the dish washer, the corn husker, etc.  You get the idea.  But I was never the biscuit maker.

So when I left home and got married I discovered I was clueless as to how to reproduce these delicious biscuits!  It was a long distance call to home and expensive, definitely out of a newlywed's budget, so I had to wait until I returned home for a visit a year later to try to get the recipe from my mom.

Ok - so you know those people who don't cook with recipes?  I found out that my mom does a lot of this cooking without recipes business - and the biscuits were one of those.  I guess she had a recipe at one time - she just had kind of memorized it and adapted it as the years went along.  So getting the recipe went something like this:

(Sitting at the kitchen table while watching the process)
Me:  So how much flour did you just put into the bowl?
Mom:  Oh, I don't know.  I'd guess about a cup or cup and a half.  No probably more like two.  I just put it in until it looks right in the bowl.
Me:  (trying to not roll my eyes - my mother HATES it when I roll my eyes) Ok - let's say two cups.  Wait!  Was that baking soda or baking powder you just put in?
Mom:  (emphatically) Baking powder!  You want baking powder for these - NOT baking soda! (I'm pretty sure she just rolled her eyes at me!)
Me:  Ok - I'll be sure to get that right.  So how much was that?
Mom:  A small handful.
Me:  Which would be.....
Mom:  I'd say a little more than a tablespoon.
Me:  We'll call it 4 teaspoons.

This goes on and I come away with a recipe that she looks over and agrees that it "could work."  Oy.

She is much more informative, though, when it comes to the proper technique in putting it all together.  She tells me not to add more flour although "you're going to want to because it's wet and sticky!  But, don't!"  I am admonished to handle the dough delicately and to gently pat it into a circle on a lightly floured surface, but keep the dough lofty and high.  "Cut them nice and high!  Don't pat the dough down too much!"  She takes our old round cutter and cuts one out, showing me just how fluffy and airy the dough is.  She gently places it in the pan and continues to cut them out, re-rolling the scraps, but the whole time acting as if she had a feather in her hand.  I feel like I'm ready to go home and tackle them.

I do and they eventually become a success - after a few tries and getting the "handling" technique down.  I have a strong "anti-raggy" dough complex that I have to fight, even today.  I just like everything to look nice along the whole process.  This is not always conducive to great breads.  Sometimes you have to wait for the pretty at the end!  Which is really when it counts anyway, right?

Ok - you're turn!

So we're going to start with these humble and simple ingredients:

and we're going to make biscuits!

You'll mix the dry ingredients together well before you add the chunks of cold, cold, cold butter.  Mix those dry ingredients really well so you don't get uneven spots of baking powder.  Yuck!  And you're not going to be handling it much after you start introducing the wet stuff so make sure it's whisked really well, or sift it if you like.  Then, using your hands, add the really cold butter chunks, and start squishing it with your fingers, working it into the flour mixture until only clumps about the size of marbles remain.

Work quickly because you don't want the butter to get too warm.  Mix the egg and the buttermilk, beating with a fork to break up the egg and get a good combination with the liquid.  Add the buttermilk mixture to the bowl and, with a large spoon, stir just until it comes together.  You will have a raggy looking dough.  Turn it out onto a floured surface.

See - I told you - it's not pretty yet.  Resist the urge to make it so!  All you do is give it a few folds to bring it together a little more.  It'll look like this:
At this point you will wrap it in plastic wrap and put it in the refrigerator (if you have the time) or freezer (if you only have about an hour.)  Let it get nice and chilled.

When it's time to bake, preheat your oven to 425.  You want a very hot oven to kick these guys off to a nice start.  Unwrap the dough and place on a lightly floured surface.  Gently press down until dough is about 1" thick.  Use a 2 1/2" round cutter, or whatever your preference, and cut them high and fluffy!  Place on a baking sheet lined with parchment paper.  I like to brush the tops with heavy cream to help them get that lovely golden glow.

If they are ready before your oven is, put the biscuits back in the freezer or fridge to keep chilled until your oven is to temperature.

Bake for 10 minutes - turn the pan - bake another 7 minutes.

My recipe is almost the same as my mother's.  I just use butter where she uses shortening and buttermilk where she uses regular milk, although I'm sure she used buttermilk from time to time as well, if that's what she had on hand.

Here's the breakdown of the ingredients:

Biscuits
Printable Recipe Card
2 c. flour (270 g)
4 t. baking powder (20 g)
1 T. sugar (15 g)
1/2 t. salt (3 g)
1 egg
1/2 c. butter (113.5 g)
2/3 c. buttermilk (146 g)


Tuesday, September 13, 2011

Touchin', Squeezin, Paninis!

Problem:  too much provolone cheese left over from a luncheon I catered last week.
Solution:  a great beginning for a flavorful panini!

I am a newcomer to the panini.  I've heard about them, I just didn't 'get it.'  Aren't' they just a grilled sandwich?  And then this bistro opened in my little town.  A bistro that is actually recognized for their cupcakes and other lovely desserts.  The savory menu, I think, is just an offshoot from the sweet menu.  Now, I'm a dessert gal, don't get me wrong.  But from the first instant my teeth sunk into their "Grownup Gourmet Grilled Cheese" panini, breaking through that delicate crunch on the outside, and then the cheesy filling engulfing my mouth with such intense flavors - I was hooked!  Done for!  A fan!  I'm pretty sure there were soft noises involved, as well as an "Oh my gosh!"  Not that anyone at the table could understand me as my mouth was full of food at the time.  But they could see I was enjoying my lunch.  Dessert?  Who needs it?

A panini, which is of Italian origin, is, quite simply, a pressed sandwich.  There are appliances you can get specifically for making them called a 'panini press', but I've also seen them done by placing a heavy pan on top while the sandwich is cooking on a griddle.  To get the full effect of the panini, though, you'd need to turn the sandwich over to get the other side grilled as well.  A press cooks both sides at once, which is helpful when you get a little crazy with your filling ingredients.

I could have just used all cheeses on my panini but I found all these guys hanging out in my kitchen so I decided to have them keep the cheese company in my lunch.  


The bread you use for a panini needs to be substantial enough to hold the ingredients as well as withstand the pressure of the press.  Today I chose a sourdough boule, slicing it into 1/2-inch slices.  I thought that grilling my veggies would bring a nice smoky element to the table so I sliced the zucchini, summer squash, and eggplant into 1/4-inch planks and cut the bell pepper into four sides.  After laying them out on a sheet tray, I used a mister and gave them a little shower of extra virgin olive oil and seasoned them with some kosher salt and pepper and took them on out to the grill.


You don't need to leave them over the heat for too long - just enough to give them their grill marks and absorb some smoky flavor.


The peppers went right in to a bowl after the grill and enjoyed a sauna created with plastic wrap over the top to seal in the moisture.  


When you char or roast a bell pepper, the outside skin can become bitter.  And bitterness is not invited to this party!  When they have steamed for about 10 minutes, take them out and use a knife to scrape off the char and the skin.  They are perfectly supple enough for the sandwich but not mush.  As a matter of fact, you'll need to restrain yourself from eating them before they make it to the sandwich.  That's just a kindly word of warning.  Their appeal is THAT strong!

With everything all sliced and grilled you are now ready to assemble your masterpiece.  I started with giving a swipe of pesto across the bread and then slicing a wedge of Laughing Cow cheese horizontally into three pieces and spacing them out across the slice.  I use Laughing Cow because it helps me control my calorie intake while getting the oozy cheesiness that my mouth craves.  I then took some bleu cheese crumbles and sprinkled a little decadence in and around the cheese wedge pieces.  Next came the slices of grilled veggies, arranged so that they didn't tumble off the sandwich.  This is where having them sliced into planks helps!  I topped the grilled veggies with some slices of fresh tomatoes and arugula and then the instigator behind this whole venture - the provolone!  On went the top bread slice and it's press time!


In my case, and my quest for calorie control (somewhat,) I skimmed some butter across the top of the bread.  However, the little bistro I mentioned earlier does not SKIM!  They apply it rather generously, I believe, along with some sprinkles of grated parmesan cheese, which adds these wonderful little cheesy crisps here and there as you take bites.  It's really rather naughty but I appreciate a little culinary mischief now and then.  You choose your level of naughtiness on this one! 


This is what came out about five minutes later.


From what I gather, a true panini is not supposed to be toasted, only pressed and steamed or warmed.  So take that for what it's worth.  My personal preference is for that little crunch at first bite so I give it a toast.  I love the visual of the layers of the colored veggies.  In fact, that was the primary goal in choosing which ones were invited!

I will provide a list of the ingredients I used for a quick reference, but the instructions have already been covered!

Song Pairing: 
Do I really need to draw the correlation here?  Touchin'?  Squeezin'?  The sultry syncopation of the introduction sets the seduction, I mean, stage, and gets you in the mood.  I suggest that you listen to the song as you eat, saving the final 1:35 "naa, naa, na, naa, naas" of the song to concentrate on and savor the cheesy, gooey, moist, "I need a napkin, here!" glory that this sandwich brings.   

Panini Ingredients
Sourdough or other artisan bread
Pesto
Laughing Cow cheese wedges
Provolone Cheese
Bleu Cheese crumbles
Zucchini
Summer Squash
Orange Bell Pepper
Eggplant
Tomato
Arugula
Butter

Saturday, September 10, 2011

Frankenstein Vegetables


Song Pairing:
Frankenstein by Edgar Winter
It's a long song but it's brilliant how it manages to be both driving and playful at the same time.  You can definitely pretend you're creating a masterpiece from "scratch."  Nuts and bolts, or, in this case, bits and pieces of remnant veggies and herbs, cast off as excess from other recipes now have a home and new life here.  Get your funky on and have fun trying this for dinner!


Farmer's markets hold the special appeal of never knowing exactly what you're going to find.  It may be the same vendors week to week, but I'm always wondering what they've brought from their gardens this particular day.  I wait to make up my weekly menu so I can best utilize my discoveries.  And this week I hit the jackpot!  Not only did I find tonight's dinner, but my next post as well!


I'm talking about that big guy in the back.  Yep.  The monster zucchini.


As soon as my eyes set upon these gargantuan zucchinis I smiled.  A BIG smile.  I was a young teen again, back on Keenan Street, tending to our family's vegetable garden.  My parents always planned  a big garden and then my brothers and sisters and I spent most of our summer vacation maintaining it.  I'm pretty sure their thought process was the precursor to today's notion that, if you keep your children insanely busy in worthwhile activities such as sports, dance, music, etc, they won't have enough time to get into trouble.  With nine children, that's a lot of time to fill.  Thus, the size of the garden grew to accommodate my parents' "needs."  Side note - it didn't work.  We still found trouble just fine.  But that's another blog.


With children of various ages manning the crops, it was inevitable that a stray zucchini would get lost here and there in the foliage.  That is until they became these dark, lurking, behemoths.  


Now, the first thing people do when they see these giants is run and get out their graters, roll up their sleeves, and set about making a mountain of shredded squash flesh destined for breads, brownies, cookies, marinara, etc.  It's one of the most popular veggies to disguise - probably because it's one of the most proliferate veggies grown and one of the least favorite to eat!  I suggest having a neighborhood survey each spring to see just which items each gardener is planting and devise some sort of policing of the zucchini.  This would solve that oddity come fall of people leaving little mounds of zucchini on neighbors' doorsteps - only to return home to find their own threshold burgeoning with somebody else's abundance.  


But, relax.  Put away the shredder.  I have another idea.  It's what my mother had me do for dinner when we found our errant zukes.  We stuffed them!

I'd chop off both ends, cut them in half lengthwise, take a large spoon, and scrape out the seeds.  Mom would put out which veggies were to be cut up and added to the ground meat.  Beyond this I can't remember exactly what else was added - only that when it was assembled I poured spaghetti sauce over it and sprinkled bread crumbs and shaky cheese (Parmesan) on top before baking it.  But having learned a bit about stuffing things since then, I can surmise that we added some bread crumbs and eggs to the mix to help it all stick together.  


Today I decided to be a little fancy.  I pulled out this gadget that came with my knife kit in culinary school but had yet to use.  


I pulled it down the outside of the squash and it easily slid along, creating an appealing striped design. 


When they are halved and scooped you've created troughs like these.


A look through my veggie bin helped me decide what could be added to the stuffing and I started chopping and dicing.  A trip to my herb garden yielded some thyme and oregano.  In addition to the standard salt and pepper, I chose some garlic powder and cumin.  


I couldn't remember if I cooked the meat before filling the squash cavity or made it like a meatloaf, using the squash as the "pan."  Since I had two halves I decided on a trial - one stuffed with a pre-cooked meat mixture and the other with the raw meat in the meatloaf fashion.  The pre-cooked version won hands down.  When you bake it raw, the meat releases a sort of scum.  Let's just say it wasn't attractive and leave it at that.  


After about an hour, that which went in to the oven as ugliness and horror, came out delicious and rather attractive.


And, now, . . . I must eat because I just took a bite "off camera" and it's even more delicious than I remembered!  So, instead of doing an "eat and run" stunt, I'll "run and eat!"


Stuffed Zucchini
Printable Recipe Card
1 large, over-sized zucchini
1 lb. ground meat (beef, pork, sausage, turkey, or a mixture)
1 t. olive oil
1/2 yellow onion, chopped
1 small carrot, shredded
1 bell pepper, seeded and chopped
1 T. kosher salt
1/2 t. black pepper
1/2 t. ground cumin
1/2 t. garlic powder
1 T. fresh oregano
1 T. fresh thyme
1 c. bread crumbs
1/2 c. grated parmesan cheese
2 eggs
2 cups marinara, divided


topping:
3/4 c. panko
1/4 c. grated parmesan
2 T. butter, melted


Preheat oven to 350.
1.   Halve the zucchini lengthwise and scoop out seeds and pulp, leaving about a 1/2" outer rim. Sprinkle with salt and pepper and set aside.
2.   Heat a skillet over medium high heat and add the olive oil.  When the olive oil is warm, add the onion and sauté for 2 minutes.  Add the peppers and carrots and sauté another 5 minutes until the onions are translucent.  Add the herbs and stir, cooking another minute or so.
3.   Add the ground meat and stir and break it up, cooking until it is no longer pink.  Add the salt, pepper, cumin, and garlic powder.  Remove from the heat and stir in the bread crumbs.  Let cool.
4.   Add the eggs and 1/2 c. grated parmesan cheese.  Stir in 1 cup of the marinara.
5.   Spray a baking dish large enough to hold the zucchini and arrange the halves in the pan, trough side up.
6.   Divide the mixture between the two halves.  Pour the remaining marinara over the halves.
7.   Combine the panko, the 1/4 c. grated parmesan, and the melted butter  - then sprinkle over each squash half.
8.   Cover with foil and bake for 45 minutes.  Remove the foil and bake for another 15 minutes, making sure the top gets nice and golden.
9.   Grate some more parmesan over the top after it's plated.

Thursday, September 8, 2011

Groovy Granola


Song pairing:
This granola makes me happy and this is quite possibly the happiest song I know.  Listening to it makes me want to skip - and it's been a good long time since I've passed the acceptable skipping age!  Make this granola, eat it, and listen to this song and everyone will wonder what you've been up to this morning ~


I'll never be able to look at a chocolate bar the same way again.


A few years ago my good friend, Lara, told me I should check out this blog she'd found called Orangette.  By this time I knew I was going to be going to culinary school and my friends were big supporters of this new adventure of mine.  They passed along any and all sorts of information they thought I'd find interesting.  Well, I followed Lara's advice  and clicked on over to the blog and made a new "friend" immediately - or at least that's how it felt.  Orangette is written like it's just you and her at the table, having a friendly chit-chat.  I started browsing her recipes right away and landed on one for granola that I've made pretty much constantly ever since.  Each time I make it I put my own spin on it.  It's become like a game to see just what I can come up with next.


Back to the chocolate bar.


You see, this granola calls for chocolate.  Chocolate!  Not that chocolate for breakfast is a novelty by any means.  You can find nuggets of chocolate in all sorts of cereals and bars.  It's just that when you get the chance to choose it for yourself it gives you this feeling of power - like being able to choose the leading man in your favorite romance novel.  If you're feeling quirky, you can choose a Seth Green or Jason Bateman equivalent, such as a Willy Wonka bar.  You say that that should be Johnny Depp?  Not in my book.  He'd be considered the deep, dark chocolate - maybe the one with the Pop Rocks.  But, this is the beauty of making it yourself.  You can use chocolate as simple as chocolate chips or as extravagant as any of these guys ~


In other words, there are no boundaries.  It's all your preference.  Is it a coincidence that most chocolate bars weigh in at about three ounces - the exact amount you need?  I think not!  And you end up with such an envious collection of chocolate to boot!


It is impossible for me to walk by a display of chocolate bars and not stop to ponder the possibilities.  People who wander by will see me clutching the bar in my hand, staring towards it but not particularly at it.  My mind is off culling the great pantry in the sky to see if I can come up with something special to complement this parcel of hope and goodness.  "Do you want to be tasting spicy chilies at breakfast?" I ask myself.  "Why, yes, that could be rather exhilarating!" I answer.  The questioning continues about whether I'll want fresh or dried fruit with this bar and what kind of syrup or flavoring can I add to the liquid to enhance what's already in there.  And it doesn't just stop with bars  . . .


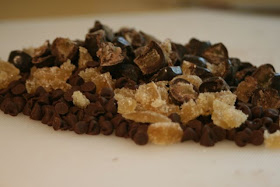
Today I decided to use some chocolate covered candied ginger I found at Trader Joe's.  


I was a little shy of the amount I needed so I added some candied ginger I had on hand and a handful of mini chocolate chips.


The syrup ingredients can also be altered to suit whichever chocolate bar you've chosen.  I was so sad to find that I had run out of ginger syrup, but added some fresh grated ginger in with the oil and honey and called it good.  You can use extracts and syrups of all flavors.


I found a chocolate bar with lavender once and used a lavender flavoring in the syrup.  The nuance was subtle but you couldn't deny it's presence.  I fancied myself in England and resisted the urge to address everyone as "Love" every morning while the batch lasted!


Whatever you choose, when everything gets tossed together for the final 'hurrah,' you have created joy and happiness.  Since the coconut curls are so much bigger than the usual shredded coconut, they announce their toasty goodness with each bite.  You've got lots of crunch going on with the nuts and oats but it's not that "scratch-the-roof-of-your mouth" kind of crunch that you get with some granola.  It yields perfectly to the bite.  And then you hit a piece of chocolate and it's all velvety seduction.  And you are hooked.  And you must have more.  And you find yourself with a fascination of chocolate bars with additives like bacon, Pop Rocks, and bread crumbs!


Groovy Granola 
adapted from French Chocolate Granola
Printable Recipe Card


3 cups old-fashioned rolled oats
1/2 cup coconut flakes (please try not to use the sweetened shredded coconut if you can avoid it)
1/2 cup chopped nuts (pecans, almonds, walnuts - your preference)
pinch of kosher salt
2 T. vegetable oil
4 T. honey (or other flavored syrup)
1 T. extract (vanilla, almond, coconut - endless possibilities)
3 oz. chocolate, chopped
dried fruits or other add-ins


1.   Preheat oven to 350 degrees.
2.   Line a sheet tray with parchment paper and set aside.
3.   Using a large bowl with plenty of room to toss ingredients together, combine the oats, coconut flakes, chopped nuts, and salt.  Mix well and set aside.
4.   In a pan on the stovetop, whisk together the oil, honey, and extract.  Heat over medium heat just until it starts to simmer and is well combined.  Remove from heat and pour over oat mixture in the bowl and toss to coat well.  Spread the mixture evenly over the sheet tray.
5.   Bake for 7 minutes and give it a stir, bringing the parts from the outer edge of the pan to the center.  Bake another 4 - 5 minutes and stir again.  Bake another 2 - 3 minutes and you're done!  It should be a beautiful golden color.  
6.  Stir and let cool.
7.  Chop the chocolate into small pieces and, when the oat mixture is completely cool, toss it in along with any other ingredients you plan on adding.  Store in an airtight container.  I don't refrigerate mine because it's usually gone fairly quickly.  If you like, though, you can store it in the refrigerator.